Tkinter Grid Again if Object Is Redefined
Hey there! This week we're returning to GUI development with Tkinter, and in this post we're going to be getting to grips with the grid geometry manager.
If y'all missed out earlier posts on Tkinter, you can check them out in the links below. In these posts we cover some foundational information on working with Tkinter, and we embrace another geometry manager called pack.
https://weblog.tecladocode.com/tkinters-pack-geometry-manager/
https://blog.tecladocode.com/side-values-in-tkinters-pack-geometry-manager/
Why should we care virtually grid?
As I just mentioned, we've already dedicated ii posts to a different geometry manager called pack, so why do we need another 1?
That's really a really good question, and equally it turns out grid is a much newer add-on to Tk than pack, and was introduced to overcome some of the shortcomings of the pack geometry manager. It's now been a staple in Tk for ii decades, then it must be doing something correct!
As I mentioned in the first postal service on pack, complex interfaces rapidly go overwhelming when using the pack geometry manager, because it can become difficult to mentally go along track of how the various widgets in a given container collaborate. There are a lot of moving parts, and a lot of pieces of configuration to keep track of.
grid is a lot more hands on than pack, then we have to rely less on Tkinter automatically negotiating an acceptable layout for all of the relevant widgets. With grid, nosotros instead ascertain a ii-dimensional table structure, and nosotros tell widgets to occupy certain cells withing that tabular array. This makes information technology a lot easier to reason nearly widget placement in more elaborate interfaces.
A minor downside is that we by and large have to specify more information up front, so pack and its very succinct layout definitions is nonetheless nifty for simpler interfaces.
Without further ado, let's kickoff looking at how to work with grid to position our widgets.
Defining the grid
The commencement step when using grid is oftentimes to ascertain the nature of the actual filigree: the 2-dimensional table we'll use to position widgets.
The configuration for the grid is done in a parent container, rather than on the grid aligned widgets themselves. This makes a lot of sense, because the configuration nosotros ascertain here is common to all of those widgets. All the widgets need to worry nearly is where they sit down within this table.
Defining a grid is not strictly necessary, and if nosotros don't supply one, Tkinter volition infer a table structure from the configuration we supply to the child widgets. More on this in a little bit.
We have 2 methods available to us for defining the layout of the grid: columnconfigure and rowconfigure.
They both have the same parameters, but as the names imply, they control different dimensions of the grid.
About of the time, you're going to specify two pieces of configuration for columnconfigure and rowconfigure: the columns or rows yous're configuring, and the weights of those columns or rows.
The weight of a row or cavalcade determines how much of the available space a row or column should occupy relative to the other rows or columns. For example, a column with a weight of 2 will exist twice equally wide equally a column with aweight of 1, assuming there's space for the widgets to fit.
In code, we might define two columns like this, where the container for our widgets is the root container:
import tkinter as tk root = tk.Tk() root.geometry("600x400") root.columnconfigure(0, weight=1) root.columnconfigure(1, weight=2) root.mainloop() Once again we've gone dorsum to our trusty setup of a stock-still size window, and we've just included our usual Tkinter boilterplate. If you're not clear on the code higher up, take a look at our earlier pack post where we cover a lot of this stuff: https://blog.tecladocode.com/tkinters-pack-geometry-manager/
In add-on to the usual lawmaking, we've defined two filigree columns, cavalcade 0 and column i, where column 1 is twice as wide equally column 0.
If we want to specify the same configuration for multiple columns, we tin can pass in a tuple of column numbers instead of just a unmarried number:
import tkinter as tk root = tk.Tk() root.geometry("600x400") root.columnconfigure((0, 2, iii), weight=1) root.columnconfigure(1, weight=2) root.mainloop() Now we take four defined columns, where column ane is twice every bit wide as whatsoever of the others.
rowconfigure works exactly the aforementioned way.
Now that we've seen how to configure the container in society to set up a grid structure, we need to learn how to put items in the filigree.
For this example, we're going to return to our trusty rectangles, and nosotros're going to first by using the showtime, simpler grid nosotros defined above.
import tkinter as tk root = tk.Tk() root.geometry("600x400") root.columnconfigure(0, weight=one) root.columnconfigure(1, weight=ii) rectangle_1 = tk.Characterization(root, text="Rectangle one", bg="dark-green", fg="white") rectangle_2 = tk.Label(root, text="Rectangle 2", bg="cherry", fg="white") root.mainloop() Here nosotros've defined a couple of coloured rectangles using the Label widget. If the options used here are not articulate to y'all, have a look at our first pack post.
At present that we've defined our rectangles, let'south utilise grid to identify them in the window. Just as with the pack examples, we'll start using grid with no meaningful configuration and so we tin see the default behaviour. Just like earlier, we'll exist adding a pocket-size corporeality of internal padding using ipadx and ipady to make the Characterization text easier to read.
import tkinter as tk root = tk.Tk() root.geometry("600x400") root.columnconfigure(0, weight=ane) root.columnconfigure(ane, weight=two) rectangle_1 = tk.Label(root, text="Rectangle ane", bg="green", fg="white") rectangle_1.grid(ipadx=10, ipady=ten) rectangle_2 = tk.Label(root, text="Rectangle 2", bg="blood-red", fg="white") rectangle_2.filigree(ipadx=x, ipady=10) root.mainloop() As we tin see the default configuration for grid looks much the same every bit pack. Nosotros just telephone call the grid method on the relevant widget and whatever configuration is passed in as an argument.
Then what does this expect like in the window?
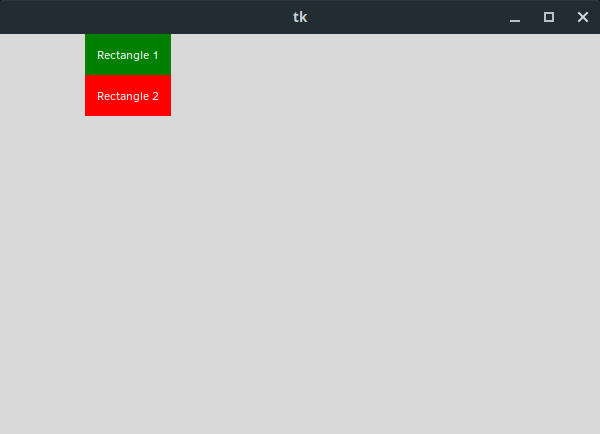
I don't know nigh y'all, merely that is not what I would have expected. Didn't we specify a two column grid for the main window?
Every bit it turns out, grid is always going to put our widgets in new rows unless we specify otherwise. There'due south a pretty good reason for this, which is that there are actually an infinite number of rows and columns. Fifty-fifty if we only configure two columns, we tin can actually put things in column 2, 5, or 67, with empty columns collapsing to nil width.
Tkinter therefore opts to puts widgets one on tiptop of the other, because vertical scrolling is relatively common, and a default layout where 60 widgets are placed side by side is generally not going to be desirable. It usually takes less configuration to put widgets in the same row where necessary, rather than to define a row value for every single widget.
So how exercise nosotros specify where the widgets should go? We tin apply the row and cavalcade parameters.
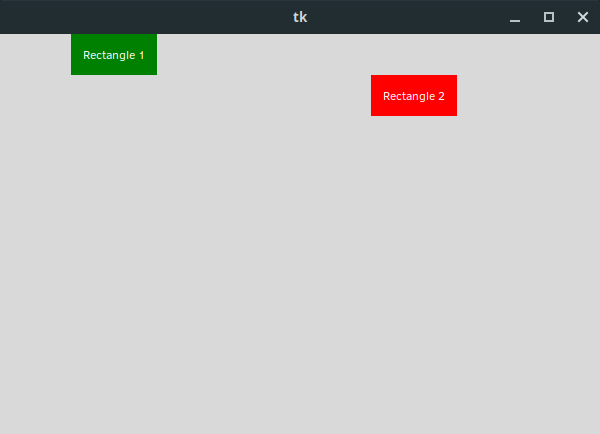
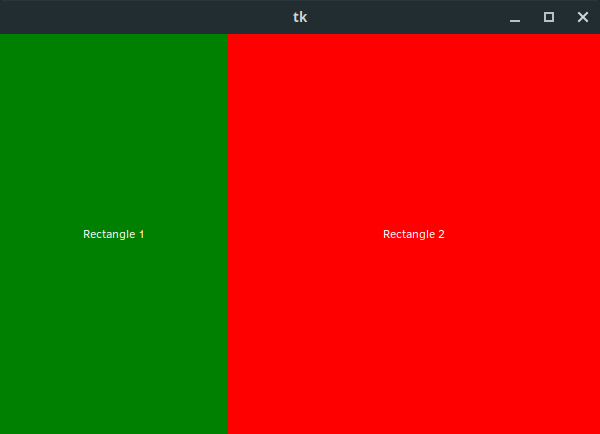
import tkinter equally tk root = tk.Tk() root.geometry("600x400") root.columnconfigure(0, weight=1) root.columnconfigure(ane, weight=2) rectangle_1 = tk.Label(root, text="Rectangle ane", bg="green", fg="white") rectangle_1.grid(cavalcade=0, ipadx=ten, ipady=x) rectangle_2 = tk.Label(root, text="Rectangle 2", bg="red", fg="white") rectangle_2.grid(cavalcade=one, ipadx=ten, ipady=ten) root.mainloop() Hither I've only defined a cavalcade value, putting the first rectangle in column 0, and the second rectangle in column ane. We might expect Tkinter to at present put the widgets in the aforementioned row, but this isn't the example. Instead they cease upwardly in the specified columns, only on unlike rows.
We therefore have to specify both row and cavalcade values for widgets to define the layout we desire in this example:
import tkinter every bit tk root = tk.Tk() root.geometry("600x400") root.columnconfigure(0, weight=1) root.columnconfigure(1, weight=2) rectangle_1 = tk.Label(root, text="Rectangle one", bg="green", fg="white") rectangle_1.filigree(column=0, row=0, ipadx=ten, ipady=10) rectangle_2 = tk.Label(root, text="Rectangle 2", bg="red", fg="white") rectangle_2.grid(column=1, row=0, ipadx=10, ipady=10) root.mainloop() We now end upwards with both rectangles on the same row, occupying the ii different columns:
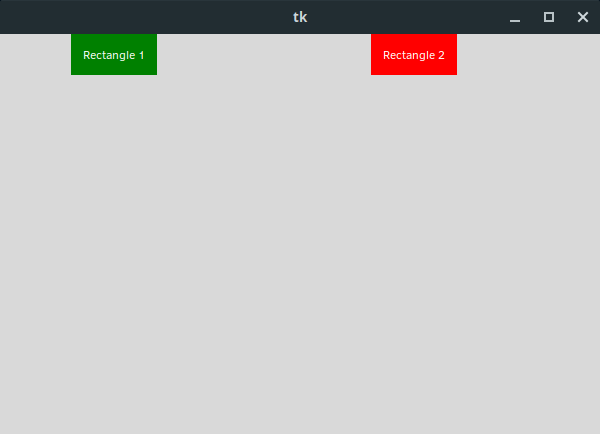
Note that we never actually defined whatever configuration for this row, so Tkinter is using a default row configuration. This means that the widgets are assigned merely the amount of vertical space required to house the widgets.
Because this row is using a completely default configuration, we could besides specify whatever row value we wanted and the layout wouldn't change at all, as long as the 2 widgets shared the same row value. Every bit I mentioned previously, empty rows and columns collapse to 0 superlative and width respectively.
That being said, using logical row and column numbering is definitely a good idea.
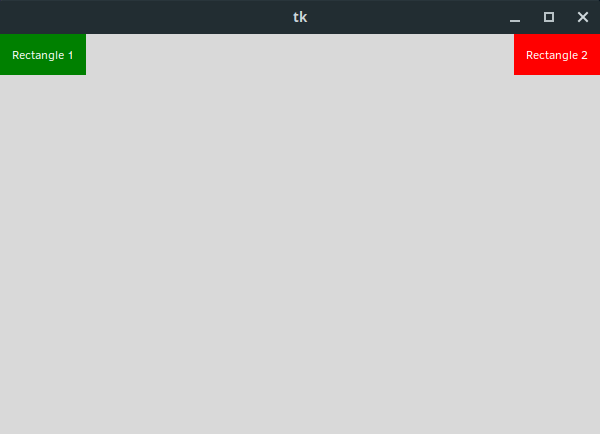
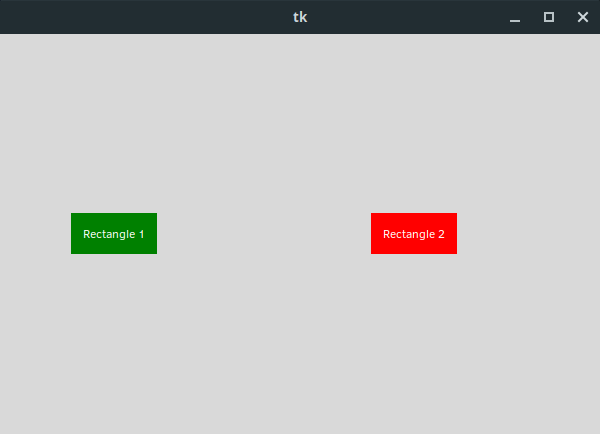
One matter you probably noticed is that our widgets are sitting in the middle of our 2 differently weighted columns, but neither widget is taking upward the space we allocated to it. Using pack we had fill and expand properties which allowed usa to assign more space to widgets, and to tell them to occupy that space. When using grid, we take a different property called sticky.
gummy accepts compass directions as values, and dissimilar combinations of these directions yield dissimilar results. You can call up of sticky equally a combination of an alignment and fill up pick.
Specifying a single compass direction causes the widgets to "stick" to a single edge of its assigned area. For instance, we can set rectangle_1 to stick to the left side of its assigned area with "West", and rectangle_2 to stick to the right side of its assigned expanse with "Eastward".
import tkinter every bit tk root = tk.Tk() root.geometry("600x400") root.columnconfigure(0, weight=i) root.columnconfigure(1, weight=2) rectangle_1 = tk.Label(root, text="Rectangle 1", bg="green", fg="white") rectangle_1.grid(column=0, row=0, ipadx=10, ipady=10, sticky="Due west") rectangle_2 = tk.Label(root, text="Rectangle 2", bg="red", fg="white") rectangle_2.filigree(cavalcade=1, row=0, ipadx=ten, ipady=ten, sticky="E") root.mainloop() This gives us something like this:
However, if we specify opposing compass directions, the widgets are stuck to both sides, which causes the widget to stretch:
import tkinter as tk root = tk.Tk() root.geometry("600x400") root.columnconfigure(0, weight=1) root.columnconfigure(1, weight=two) rectangle_1 = tk.Label(root, text="Rectangle one", bg="green", fg="white") rectangle_1.filigree(column=0, row=0, ipadx=ten, ipady=10, gummy="EW") rectangle_2 = tk.Label(root, text="Rectangle 2", bg="red", fg="white") rectangle_2.grid(column=1, row=0, ipadx=10, ipady=10, sticky="EW") root.mainloop() 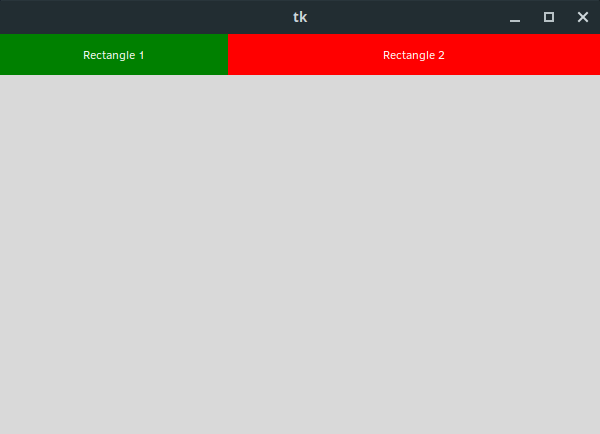
We can now very conspicuously run across our column weights at piece of work, with rectangle_2 taking up twice every bit much space as rectangle_1.
Then what happens when we set a widget to stick to all edges of its assigned area?
import tkinter as tk root = tk.Tk() root.geometry("600x400") root.columnconfigure(0, weight=1) root.columnconfigure(one, weight=2) rectangle_1 = tk.Label(root, text="Rectangle 1", bg="light-green", fg="white") rectangle_1.grid(column=0, row=0, ipadx=ten, ipady=10, gummy="NSEW") rectangle_2 = tk.Label(root, text="Rectangle 2", bg="red", fg="white") rectangle_2.grid(cavalcade=1, row=0, ipadx=x, ipady=10, mucilaginous="NSEW") root.mainloop() Hither we've specified a "NSEW" equally our viscous value for both widgets, which means information technology will stick to all edges of its assigned area. You can likewise use a tuple if you prefer, and Tkinter has constants divers which you tin use instead of strings:
rectangle_1.grid(column=0, row=0, ipadx=ten, ipady=10, gluey=("Due north", "S", "E", "West")) rectangle_1.filigree(column=0, row=0, ipadx=10, ipady=10, viscid=(tk.N, tk.Due south, tk.E, tk.W)) rectangle_1.filigree(cavalcade=0, row=0, ipadx=10, ipady=x, gluey=tk.NSEW) They're all the exact same, so utilize whichever version you adopt.
However, the code might not produce the result yous expected:

Call up that the sticky option causes the widget to stick to a given edge of its assigned surface area, only earlier nosotros said that past default, Tkinter just assigns an corporeality of row space equal to the meridian of the widgets inside. They don't need whatever more, after all.
Nosotros can specify a bit of configuration for row 0 to rectify this, giving it a weight of ane.
import tkinter as tk root = tk.Tk() root.geometry("600x400") root.columnconfigure(0, weight=ane) root.columnconfigure(1, weight=ii) root.rowconfigure(0, weight=one) rectangle_1 = tk.Label(root, text="Rectangle i", bg="green", fg="white") rectangle_1.grid(column=0, row=0, ipadx=10, ipady=x, sticky="NSEW") rectangle_2 = tk.Label(root, text="Rectangle 2", bg="scarlet", fg="white") rectangle_2.grid(column=1, row=0, ipadx=10, ipady=10, mucilaginous="NSEW") root.mainloop() And merely similar that, our widgets fill up the whole window:
Notation that by default, widgets have a viscid value of None, and then they volition be centred in the assigned area. Adding a row configuration, just no sticky values will give us something like this:
Giving weights to empty rows
Before in the post I noted that empty rows collapse to naught tiptop, but this is merely true when they have a weight of 0.
We can assign weights to empty rows to influence the layout of widgets in other rows.
For example, nosotros can give a weight of 1 to an empty row below the master content to limit the outset row to only half the screen:
import tkinter as tk root = tk.Tk() root.geometry("600x400") root.columnconfigure(0, weight=i) root.columnconfigure(i, weight=2) root.rowconfigure((0, 1), weight=1) rectangle_1 = tk.Label(root, text="Rectangle 1", bg="dark-green", fg="white") rectangle_1.grid(column=0, row=0, ipadx=10, ipady=ten, sticky="NSEW") rectangle_2 = tk.Label(root, text="Rectangle 2", bg="cherry-red", fg="white") rectangle_2.filigree(column=ane, row=0, ipadx=10, ipady=10, sticky="NSEW") root.mainloop() 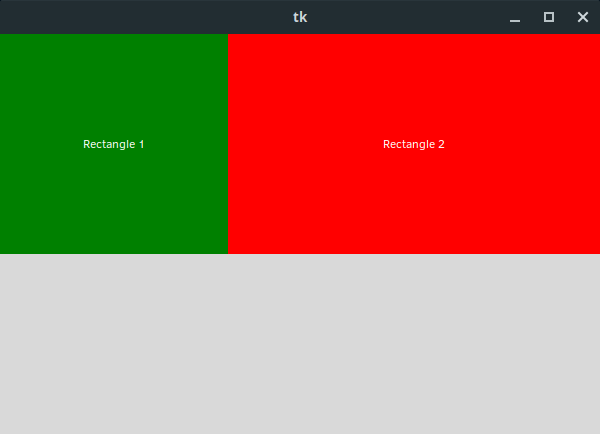
Spanning rows and columns
The last matter nosotros take to talk about is spanning multiple rows and columns. When defining our grid, we're mostly concerned with the the layout of the smaller widgets within the window, but what if we need a header bar? Or if we need a large selection box on the side, like in a music player.
Luckily this is very easy in Tkinter, and takes a single slice of configuration.
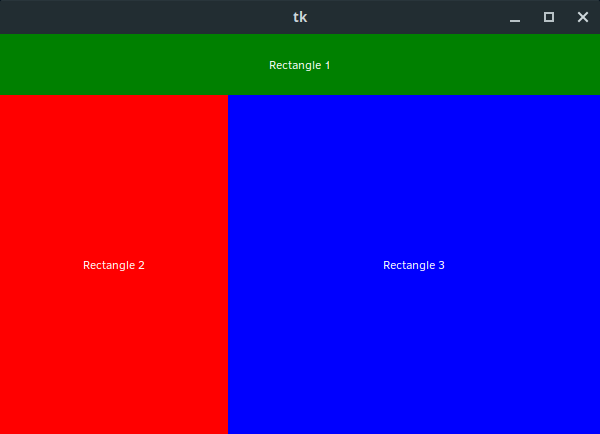
Let's add together a third rectangle, then that we stop up with 1 spanning the entire top row:
import tkinter every bit tk root = tk.Tk() root.geometry("600x400") root.columnconfigure(0, weight=1) root.columnconfigure(1, weight=2) root.rowconfigure(ane, weight=1) rectangle_1 = tk.Characterization(root, text="Rectangle i", bg="green", fg="white") rectangle_1.filigree(column=0, row=0, columnspan=2, ipadx=20, ipady=xx, viscid="NSEW") rectangle_2 = tk.Characterization(root, text="Rectangle two", bg="cerise", fg="white") rectangle_2.grid(cavalcade=0, row=i, ipadx=10, ipady=10, viscous="NSEW") rectangle_3 = tk.Characterization(root, text="Rectangle 3", bg="bluish", fg="white") rectangle_3.grid(column=1, row=1, ipadx=10, ipady=10, sticky="NSEW") root.mainloop() There were quite a few changes here, and then let'southward brand certain we properly understand what's going on.
First our rowconfigure method is prepare to only affect row 1, which is the second row. The first row is therefore going to be using the default configuration.
rectangle_1 now has a little bit of extra internal padding and has a new keyword argument of columnspan=ii. This is what allows the widget to span multiple columns as we'll come across in a moment.
rectangle_2 is now on row 1, and sits in the first column.
A new rectangle_3 was added, which sits in the second row and column, but is otherwise the same as rectangle_2, just with some different text and a different colour background.
Here is what information technology all looks like:
If you lot need a widget to bridge multiple rows instead of multiple columns, you can apply rowspan instead, only it otherwise works in exactly the same way.
Wrapping up
With that you should be able to create some pretty interesting layouts with Tkinter and the grid geometry managing director. I really hope y'all learnt something new.
If you lot're interested in learning more about Tkinter, we've released an in-depth course where nosotros teach you everything you need to know, plus we build a tonne of cool Tkinter apps too. Bank check out the GUI Development with Python and Tkinter class!
Source: https://blog.teclado.com/tkinters-grid-geometry-manager/
0 Response to "Tkinter Grid Again if Object Is Redefined"
Post a Comment